Having heard a lot about the latest free virtualization from Microsoft, Hyper-V server 2012 , I coudnt resist giving it a whirl.. After all, it is not daily that Microsoft comes out with "free" offerings ;)
Let us admit it..Ever since the advent of virtualization, we have few physical servers lying around.All of them have joined the virtualization bandwagon. My case was no different, so I decided to try out Hyper-V server 2012 as a virtual machine in VMware Workstation 8 installed in my PC.
Installation preparation:
Few things to be taken care before you start the actual installation
1)Download the Hyper V Server 2012 ISO from Microsoft site:
http://technet.microsoft.com/en-US/evalcenter/dn205299.aspx
2)VMware workstation 8 does not have Server 2012 in the Windows OS list.Hence you need to select the option "Windows Server 2008 R2 x64" when you create the Virtual machine

3) There is a small tweak to the Processor settings that should be done before starting the installation. Edit the Virtual machine settings->Processors and select the option "Virtualize Inter VT-x/EPT or AMD-V/RVI"

4) The last step is to tweak the vmx file of the VM and add the following setting
hypervisor.cpuid.v0="FALSE"
PS: The vmx file can be found in the installation directory of the VM,Go to VM settings-> Options->Genaral and refer to the Working directory setting on the right pane
All done now!! You can connect the downloaded ISO and start the installation..
Installation procedure:
It is pretty straight forward, screenshots below
1)Select the language,time & keyboard format

2)Accept the License agreement

3)Now the installation will start

4)Once completed, you will get a prompt saying that the administrator password needs to be changed.

5)Set the administrator password and login!!

Now that you have logged in , you will be welcomed by two windows, One command prompt in a normal shade of black and another command prompt in a pretty shade of blue , called sconfig.cmd

As you guessed correctly, this is a stripped down server core edition of Windows Server 2012 with Hyper-V and hence there will not be any GUI. You need to do the initial configurations from the sconfig.cmd prompt
Initial Configuration:
First things first, lets get the network configured
1)Select option 8. It will show the current network connection settings.
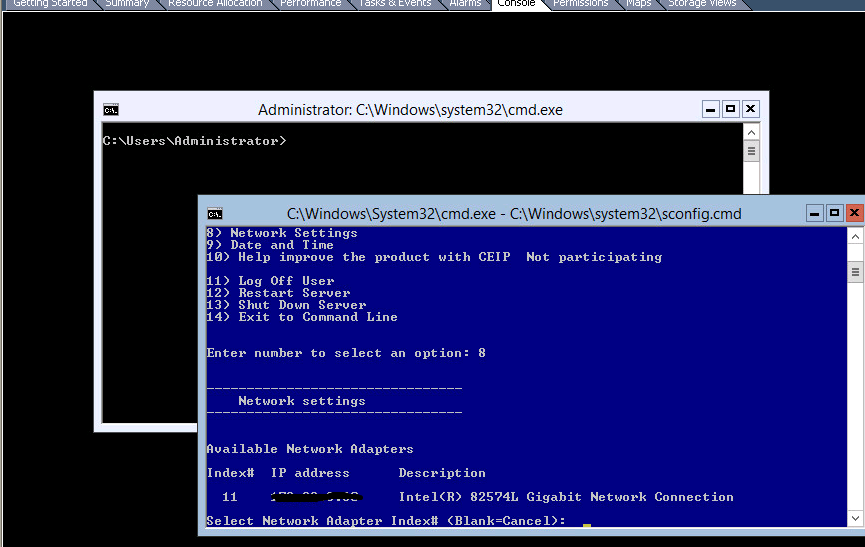
2)If you already have a DHCP server in your network, you will automatically get the IP from it. However, it is always good to set a static IP from a management perspective. Inorder to set a static IP, select the Index number of the adapter. You will get options to set the IP address, DNS server as well as to clear the DNS settings

3) While all was setup and done, I realized that I was unable to ping to the hyper-V server from any of the other machines in the network. However, the server was able to ping to other machines. Turned out that ping is not enabled by default, we need to enable it through the Renote management option in sconfig. Select option 4 to do this

4)You need to select the option number 3 in above menu ie "Configure Server response to Ping" to enable ping to the machine

In my next blog post, I will explain how to manage your Hyper V server remotely..
Reference for Installation prep: This nice blog from Veeam
http://www.veeam.com/blog/nesting-hyper-v-with-vmware-workstation-8-and-esxi-5.html
Let us admit it..Ever since the advent of virtualization, we have few physical servers lying around.All of them have joined the virtualization bandwagon. My case was no different, so I decided to try out Hyper-V server 2012 as a virtual machine in VMware Workstation 8 installed in my PC.
Installation preparation:
Few things to be taken care before you start the actual installation
1)Download the Hyper V Server 2012 ISO from Microsoft site:
http://technet.microsoft.com/en-US/evalcenter/dn205299.aspx
2)VMware workstation 8 does not have Server 2012 in the Windows OS list.Hence you need to select the option "Windows Server 2008 R2 x64" when you create the Virtual machine
3) There is a small tweak to the Processor settings that should be done before starting the installation. Edit the Virtual machine settings->Processors and select the option "Virtualize Inter VT-x/EPT or AMD-V/RVI"
4) The last step is to tweak the vmx file of the VM and add the following setting
hypervisor.cpuid.v0="FALSE"
PS: The vmx file can be found in the installation directory of the VM,Go to VM settings-> Options->Genaral and refer to the Working directory setting on the right pane
All done now!! You can connect the downloaded ISO and start the installation..
Installation procedure:
It is pretty straight forward, screenshots below
1)Select the language,time & keyboard format
2)Accept the License agreement
4)Once completed, you will get a prompt saying that the administrator password needs to be changed.
5)Set the administrator password and login!!
Now that you have logged in , you will be welcomed by two windows, One command prompt in a normal shade of black and another command prompt in a pretty shade of blue , called sconfig.cmd
As you guessed correctly, this is a stripped down server core edition of Windows Server 2012 with Hyper-V and hence there will not be any GUI. You need to do the initial configurations from the sconfig.cmd prompt
Initial Configuration:
First things first, lets get the network configured
1)Select option 8. It will show the current network connection settings.
2)If you already have a DHCP server in your network, you will automatically get the IP from it. However, it is always good to set a static IP from a management perspective. Inorder to set a static IP, select the Index number of the adapter. You will get options to set the IP address, DNS server as well as to clear the DNS settings
3) While all was setup and done, I realized that I was unable to ping to the hyper-V server from any of the other machines in the network. However, the server was able to ping to other machines. Turned out that ping is not enabled by default, we need to enable it through the Renote management option in sconfig. Select option 4 to do this
4)You need to select the option number 3 in above menu ie "Configure Server response to Ping" to enable ping to the machine
In my next blog post, I will explain how to manage your Hyper V server remotely..
Reference for Installation prep: This nice blog from Veeam
http://www.veeam.com/blog/nesting-hyper-v-with-vmware-workstation-8-and-esxi-5.html
When doing this on esxi 5.5 and nest hyperv-server 2012R2 --> Hypervisor is not running.
ReplyDeleteHow to fix this?
Thx
Windows seever 2012 R2 is available in the listed operating systems for Esxi 5.5. You shld select that during installation. VMware also suggest that the VM hardware version be upgraded to 9 for nested Hypervisor to work. However it worked for me in version 8..If you are using free version of ESXi, and you upgrade to version 9 you would no longer be able to edit the vm settings from the VI client. Be mindful of that when you upgrade the vm hardware version. Let me know how it goes ..
ReplyDelete