This is Part 2 of my blog post on DRaaS using Azure. You can view first part of the blog here
In first part, we discussed how to protect your on-prem physical servers using Azure Site Recovery services. Having a DR strategy and enabling protection is not always enough. You should ensure that your DR strategy will work as expected when a disaster strikes. In case of usual DR solutions, it is not always possible to test the DR strategy without downtimes. However, Azure Site Recovery provides you with an option to test your DR strategy and keep it well oiled and battle ready!! Test failover to the rescue.. Lets see how we can do a test failover of on-prem physical services to Azure.
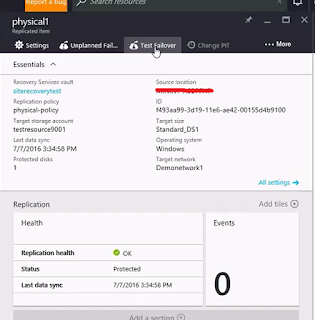
Select the vault where your replicated data resides. Select the settings, and choose the replicated items.

Select the option "Test failover"
Select the settings of the test failover. The failover direction will be automatically selected, ie from on-prem to Azure. You can select the recovery point and the virtual network. Recovery point can be the latest point in time, latest processed point in time, latest application consistent point in time or even a custom restore point. The virtual network should not be same as what you will be using in your production, ie the one that you specified in the target configuration while enabling the replication
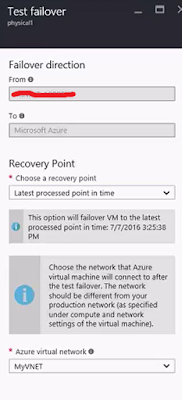
Click ok and the test failover will begin!!
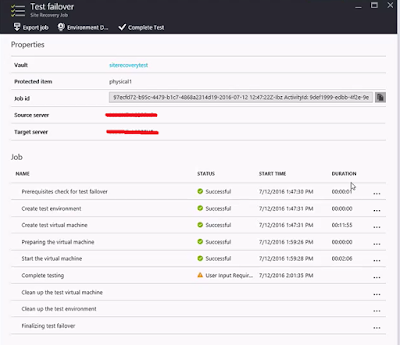
Now, if you go and check the job status you can see a number of things happening. The test failover will create a test environment, spin up your VM and at one point wait for your input to complete testing
The VM created by the test failover will be listed in the portal now. You will have to do some additional configurations though to connect to the VM and test your applications
- Go to the settings of the VM, select the NIC card and associate a public address to it
- Now associate a NSG to the NIC card and create the rules that you require, for eg: RDP access, access to a web site that you might be running in the VM etc
After that the connect button of the VM will be enabled and you can connect to it and test your applications.
All done now and if you are happy with the DR test, you can clear the failover environment with a single click. Go back to the test failover job, click on "complete failover" . You will have to provide a reason, and then click ok.
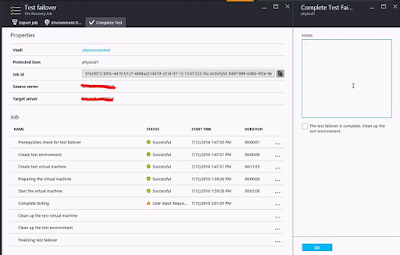
That's and the test environment will be magically cleaned up by ASR !! Now that is a very easy and clean way of testing your DR strategy without disturbing any of your existing environments..
In first part, we discussed how to protect your on-prem physical servers using Azure Site Recovery services. Having a DR strategy and enabling protection is not always enough. You should ensure that your DR strategy will work as expected when a disaster strikes. In case of usual DR solutions, it is not always possible to test the DR strategy without downtimes. However, Azure Site Recovery provides you with an option to test your DR strategy and keep it well oiled and battle ready!! Test failover to the rescue.. Lets see how we can do a test failover of on-prem physical services to Azure.
Select the vault where your replicated data resides. Select the settings, and choose the replicated items.

Select the option "Test failover"

Select the settings of the test failover. The failover direction will be automatically selected, ie from on-prem to Azure. You can select the recovery point and the virtual network. Recovery point can be the latest point in time, latest processed point in time, latest application consistent point in time or even a custom restore point. The virtual network should not be same as what you will be using in your production, ie the one that you specified in the target configuration while enabling the replication

Click ok and the test failover will begin!!
Now, if you go and check the job status you can see a number of things happening. The test failover will create a test environment, spin up your VM and at one point wait for your input to complete testing

The VM created by the test failover will be listed in the portal now. You will have to do some additional configurations though to connect to the VM and test your applications
- Go to the settings of the VM, select the NIC card and associate a public address to it
- Now associate a NSG to the NIC card and create the rules that you require, for eg: RDP access, access to a web site that you might be running in the VM etc
After that the connect button of the VM will be enabled and you can connect to it and test your applications.
All done now and if you are happy with the DR test, you can clear the failover environment with a single click. Go back to the test failover job, click on "complete failover" . You will have to provide a reason, and then click ok.

That's and the test environment will be magically cleaned up by ASR !! Now that is a very easy and clean way of testing your DR strategy without disturbing any of your existing environments..
Comments
Post a Comment