In this blog, I will explain the steps required to run a nested KVM hypervisor on Vmware ESXi. The installation of KVM is done on Ubuntu 13.10(64 bit).
Note: It is assumed that you have already installed your Ubuntu 13.10 VM in ESXi, and hence we will not look into the Ubuntu installation part.
1) Upgrade VM Hardware version to 9.
In my ESXi server, the default VM hardware version was 8. So I had to shutdown my VM and upgrade the Hardware version to 9 to get the KVM hypervisor working. You can right click the VM and select the Upgrade hardware option to do this.
2)In the ESXi host In /etc/vmware edit the 'config' file and add the following setting
vhv.enable = "TRUE"
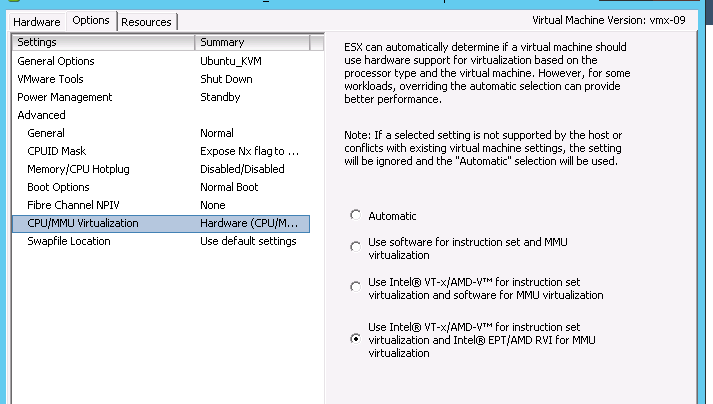
3)Edit the VM settings and go to VM settings > Options > CPU/MMU
Virtualization . Select the Intel EPT option
4) Go to Options->CPUID mask> Advanced-> Level 1, add the following CPU mask level
ECX ---- ---- ---- ---- ---- ---- --H- ----
5) Open the vmx file of the Ubuntu VM and add the following setting
monitor.virtual_exec = “hardware”
hypervisor.cpuid.v0 = “FALSE”
KVM installation steps
egrep -c '(vmx|svm)' /proc/cpuinfo
You should get output as 1, which means hardware virtualization is supported. Also you should see hvm flags in the output when you run the following command
cat /sys/hypervisor/properties/capabilities
Note: It is assumed that you have already installed your Ubuntu 13.10 VM in ESXi, and hence we will not look into the Ubuntu installation part.
1) Upgrade VM Hardware version to 9.
In my ESXi server, the default VM hardware version was 8. So I had to shutdown my VM and upgrade the Hardware version to 9 to get the KVM hypervisor working. You can right click the VM and select the Upgrade hardware option to do this.
2)In the ESXi host In /etc/vmware edit the 'config' file and add the following setting
vhv.enable = "TRUE"
3)Edit the VM settings and go to VM settings > Options > CPU/MMU
Virtualization . Select the Intel EPT option
4) Go to Options->CPUID mask> Advanced-> Level 1, add the following CPU mask level
ECX ---- ---- ---- ---- ---- ---- --H- ----
5) Open the vmx file of the Ubuntu VM and add the following setting
monitor.virtual_exec = “hardware”
hypervisor.cpuid.v0 = “FALSE”
KVM installation steps
Once the
above configurations are done in ESXi and the VM, hardware virtualization would
be supported in the VM. Inorder to confirm that, run the following command in
the Ubuntu VM.
egrep -c '(vmx|svm)' /proc/cpuinfo
You should get output as 1, which means hardware virtualization is supported. Also you should see hvm flags in the output when you run the following command
cat /sys/hypervisor/properties/capabilities
Or else you could also run the following
command
kvm-ok
The output should be as follows:
INFO: /dev/kvm exists
KVM acceleration can be used
If the above command succeeds,
proceed with the remaining steps below
1)Install KVM
sudo apt-get install qemu-kvm libvirt-bin
ubuntu-vm-builder bridge-utils
2)Add user to libvirtd group
$ sudo adduser <username> libvirtd
username
should be the same as the admin user that you are logged in with(the one
created during Ubuntu installation)
3)Set
permissions
The sock
file permission should be as follows
$ sudo ls -la /var/run/libvirt/libvirt-sock
srwxrwx--- 1 root libvirtd 0 2010-08-24 14:54
/var/run/libvirt/libvirt-sock
The /dev/kvm permission should be
as follows
$ ls -l
/dev/kvm
crw-rw----+ 1 root libvirtd 10, 232 Jul 8 22:04 /dev/kvm
sometimes, the device group would
be root, in that case change it to libvirtd
sudo chown root:libvirtd /dev/kvm
Log off and log in for the
changes to take effect
4)Install GUI
In the default Ubuntu
installation GUI is not installed. You could choose to install it followed by
if you plan to use the graphical
user interface virt-manager to manage the VMs in KVM
First install the Ubuntu GUI
sudo apt-get install --no-install-recommends
ubuntu-desktop
This will get a bare minimum
installation of the GUI, that would serve our purpose of using Virt-manager
Reboot the machine after
installation, and you can login to the GUI from the VM console
Now, Install the virt-manager
using the following command
sudo apt-get install virt-manager
5)Access Virt-manager to
create/manage VMs in KVM
Once you login to GUI, the virt
manager can be found by browing /Usr/share/applications and select Virt-manager
If all turns out well, you should
be able to see the Virt-manager connected to localhost(QEMU). Now you can start
creating your VMs!!!
Hi Expert,
ReplyDeleteI can't apply step 4 when I put ECX ---- ---- ---- ---- ---- ---- --H- ---- I have an eroor
Can you tell me what the error is? Have you completed step 1, 2 & 3 successfully?
DeleteThank you so much for these instructions. I'm preparing for a Red Hat certification and I used the first part of this tutorial. If it wasn't for this, I would have had to install CentoOS on a different machine in order to learn about KVMs.
ReplyDeleteHi Manoel..Happy that the blog was helpful :)
Deleteif your CPU doesn't have virtualization extensions, KVM won't work. VirtualBox and VMware would, but with reduced speed. Xen is the only solution that would give you a good performance.
ReplyDeletekvm vs vmware