Now that we have had a look at how to do the Installation and initial configuration of Hyper V Server 2012 in my previous blog post, lets start on the management part.
In this blog, I will explain how to manage your Hyper V installation from a Windows 8 machine
Remote management:
Since Hyper V Server 2012 server core machine, you may want to manage it remotely using the familiar GUIs and MMC consoles. You can do so remotely, but before that you need to set the firewall rules to allow that.In the command prompt windows of the server, get a poweshell prompt by typing in "powershell". Now you can execute the following powershell command
Enable-NetFirewallRule -DisplayGroup *
Note: I used this command since it is my test network, you may want to lockdown the firewall rules a bit if in case of production network
Inorder to connect to the Hyper V server using MMC from my PC, I had to run the following command in the PC command prompt
cmdkey /add:<ServerName> /user:<UserName> /pass:<password>
Servername - Used IP of the Hyper-v server
Username,Password -> Provided credentials of the Hyper-V
Ref: http://technet.microsoft.com/en-us/library/ddb147c1-621c-4b89-9003-81c93ba050d7#BKMK_1.4
In this scenario, Hyper V was not member of Domain , by my PC was..hence by default when we try connecting to Hyper V server through MMC, it will try to connect using your domain credentials and you will get an error.
Managing from Windows 8 PC:
1) Hyper V management tools is available as a feature in Windows 8. You can install the same from "Turn Windows features on or off" windows

PS: You can also manage Hyper V from your windows 7 PC by installing the Remote administration tools pack . Somehow the installation was taking ages in my Windows 7 machine and hence I opted for Windows 8
2) Now you need to set the windows firewall rules in Windows 8 to allow access to the Hyper V server. In an elevated powershell window, run the following command
Enable-NetFirewallRule -DisplayGroup *
3) In my test scenario, both Hyper V and Windows 8 PC(hereby referred to as client machine) were not members of the domain. So if you want to manage the hypervisor from the client machine, you need to create a local admin account in Hyper V that matches your client admin credentials. You can do so by using option 3 in sconfig.cmd window

4) Now if you try conecting to the Hyper V Server from the Hyper V manager, you might get the
“Access denied. Unable to establish communication between Client and Server”. You will have to tweak the COM security permissions on your client to sort this out. This can be done from the DCOMCNFG MMC.
Open the console, go to Component Services > Computers > My Computer
Right click, select properties of "My Computer" -> COM Security Tab
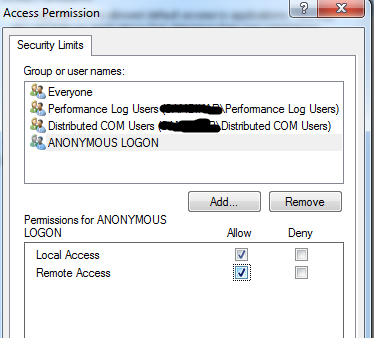
Select "Edit Limits" on the Access permissions area

Scroll down to find the "Anonymous Login" group and ensure that "Remote access" is allowed
5) You can set the Server name in the Hyper V server 2012 using the 2nd option in the sconfig.cmd window and use this server name in Hyper V manager to connect to the Hypervisor

Note: If you client machine is not in domain, you will need to add a host entry in the client host file to ensure that the name resolution happens
After this, you should be able to connect to the Hyper V Server from the management console and create VMs !!!..
Since Hyper V Server 2012 server core machine, you may want to manage it remotely using the familiar GUIs and MMC consoles. You can do so remotely, but before that you need to set the firewall rules to allow that.In the command prompt windows of the server, get a poweshell prompt by typing in "powershell". Now you can execute the following powershell command
Enable-NetFirewallRule -DisplayGroup *
Note: I used this command since it is my test network, you may want to lockdown the firewall rules a bit if in case of production network
Inorder to connect to the Hyper V server using MMC from my PC, I had to run the following command in the PC command prompt
cmdkey /add:<ServerName> /user:<UserName> /pass:<password>
Servername - Used IP of the Hyper-v server
Username,Password -> Provided credentials of the Hyper-V
Ref: http://technet.microsoft.com/en-us/library/ddb147c1-621c-4b89-9003-81c93ba050d7#BKMK_1.4
In this scenario, Hyper V was not member of Domain , by my PC was..hence by default when we try connecting to Hyper V server through MMC, it will try to connect using your domain credentials and you will get an error.
Managing from Windows 8 PC:
1) Hyper V management tools is available as a feature in Windows 8. You can install the same from "Turn Windows features on or off" windows
PS: You can also manage Hyper V from your windows 7 PC by installing the Remote administration tools pack . Somehow the installation was taking ages in my Windows 7 machine and hence I opted for Windows 8
2) Now you need to set the windows firewall rules in Windows 8 to allow access to the Hyper V server. In an elevated powershell window, run the following command
Enable-NetFirewallRule -DisplayGroup *
3) In my test scenario, both Hyper V and Windows 8 PC(hereby referred to as client machine) were not members of the domain. So if you want to manage the hypervisor from the client machine, you need to create a local admin account in Hyper V that matches your client admin credentials. You can do so by using option 3 in sconfig.cmd window
4) Now if you try conecting to the Hyper V Server from the Hyper V manager, you might get the
“Access denied. Unable to establish communication between Client and Server”. You will have to tweak the COM security permissions on your client to sort this out. This can be done from the DCOMCNFG MMC.
Open the console, go to Component Services > Computers > My Computer
Right click, select properties of "My Computer" -> COM Security Tab
Select "Edit Limits" on the Access permissions area
Scroll down to find the "Anonymous Login" group and ensure that "Remote access" is allowed
5) You can set the Server name in the Hyper V server 2012 using the 2nd option in the sconfig.cmd window and use this server name in Hyper V manager to connect to the Hypervisor
Note: If you client machine is not in domain, you will need to add a host entry in the client host file to ensure that the name resolution happens
After this, you should be able to connect to the Hyper V Server from the management console and create VMs !!!..
I followed your guideline from the beginning to the end but still no success. Hyper-V Manager displayed error message: "Hyper-V encountered an error trying to access an object on computer "MyHyperVserver" because the object was not found. The object might have been deleted, or you might not have permission to perform the task. Verify that the VMM service on the computer is running. If the service is running, try to perform the task again by using Run as Administrator".
ReplyDeleteI do have created a local admin on my server that matched my client credential. I also checked anonymous access box in the dcomcnfg.
What should I do?
Can you confirm if your windows 8 box and HyperV are in the same domain?what is the service account that the vmm service is using?
ReplyDeleteSorry for my late inform. Currently I fixed my problem, that was actually my mistake. Your guideline is perfect. Thank you so much again for this helpful post.
ReplyDeleteHappy to hear that the issue is resolved :)
ReplyDelete